All of us who use Photoshop open it, optimistically, so we can make a photo that already looks good, look even better. The lighting is just right, the subject matter is straightforward, and the timing seems perfect. All that’s needed is a little clarity, some subtlety that makes details “pop.” In some instances that quest for perfection leads people to try to learn how to sharpen an image in Photoshop.
Sharpening image is easy – until you do it. One tiny tweak can alter the mood of an entire photo. Texture becomes louder. Edges begin to demand attention. Instead of reinforcing the picture, the sharpening starts to lead it.
This is not a lack of talent. It is a lack of skill. Photoshop has powerful tools, but it seldom tells you how much is too much or why one technique may be superior to another. If you have been interested in how to sharpen photos in Photoshop but have always been afraid that your images might appear too manipulated, here is a tutorial on how to do just that the right way.
What Image Sharpening Really Means
When people google how to sharpen an image in Photoshop, they are usually hoping that it will somehow recreate the details that were lost. But that’s not how it works in Photoshop. It doesn’t invent new detail, it just draws more attention to the detail that’s there, by increasing the contrast between light and dark where light meets dark. This makes textures clearer and details pop, generating a sense of sharpness.
Think of it as tracing over the lines of a drawing. Nothing is being added, and now the lines are sharper. Edge enhancement can do a lot of good for an image, but one should always be careful. Smooth surfaces like skin or sky can reveal noise, and tiny details like hair or thread can become crisp. When you learn how to sharpen an image in Photoshop, you can add detail with a natural, deliberate effect.
Before You Sharpen an Image in Photoshop
It is very important to prepare your photo prior to sharpening it in order to get natural and accurate results. These guidelines allow you to enhance the image details without getting noise, halos, or sharp edges.
1. Sharpen at the Final Output Size Only
The way sharpening works depends on the size of the image. If you resize your image after sharpening the edges might become either too strong or too soft.
2. Use a Duplicate Layer or Smart Object
Don’t use the background layer for sharpening directly. Employing a duplicate or Smart Object makes the process non destructive and gives you the option to change the settings without losing the original.
3. Zoom Level Myths (100% vs Fit to Screen)
A lot of beginners sharpen at Fit to Screen, thus pixel, level changes are hidden. In order to see edges and textures properly, always check at 100% zoom. Such a habit guarantees that sharpening is more accurate and one avoids unrealistic results.
Most Popular Methods for Image Sharpening in Photoshop
Adobe’s Photoshop offers many options for improving photo clarity, and it is important to be aware of the best tool for each situation. Sharpening itself does not create any new details but highlights the edges, therefore textures and tiny elements become noticeable.
Unsharp Mask
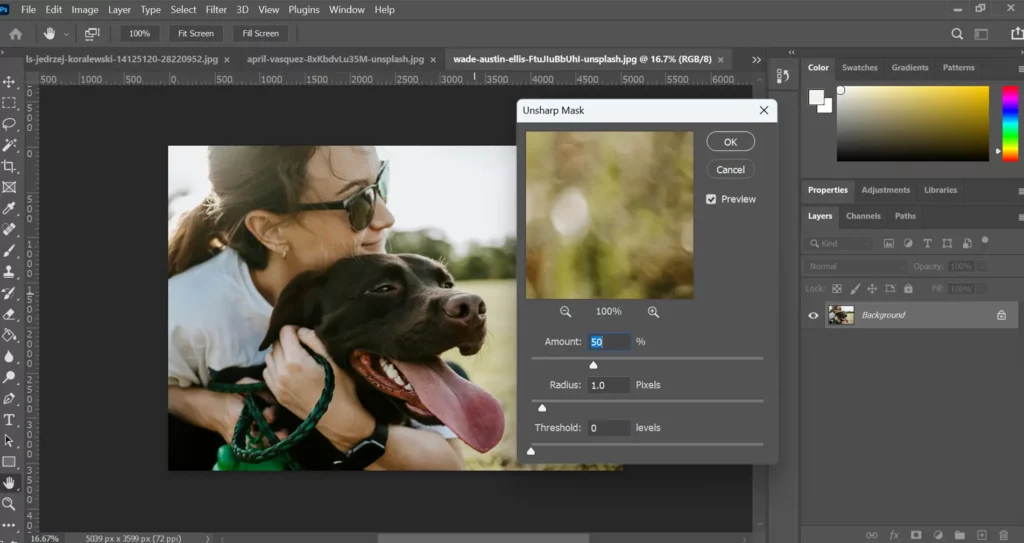
Open Filter → Sharpen → Unsharp Mask. Start with a low Radius and slowly increase Amount while watching edges at 100% zoom, stopping as soon as halos appear.
When to Use: For images that have medium, leveled details and need a slight clue of the edges.
When to Avoid: Highly textured images or noisy ones, since it will highlight imperfections.
Pros: It is immediate and efficient for little changes, it is also very easy to apply to the majority of images.
Cons: It is very easy to over-sharpen, or it may give the effect of halos if used too excessively.
Smart Sharpen
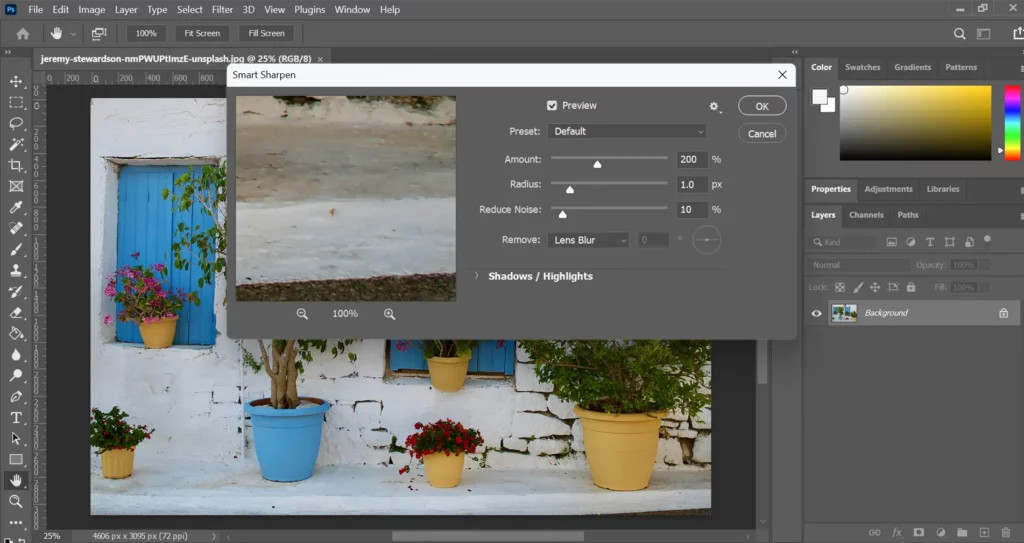
Go to Filter → Sharpen → Smart Sharpen and choose “Remove: Gaussian Blur.” Increase Amount gradually, keep Radius small, and use the Shadow and Highlight controls to avoid harsh contrast.
When to Use: It is great for most photos and beginners learning how to sharpen photos in Photoshop.
When to Avoid: Overly crisp images that do not need additional sharpening.
Pros: Versatile, intuitive, reduces the risk of over-processing.
Cons: Slightly more settings to manage than Unsharp Mask.
High Pass Sharpening
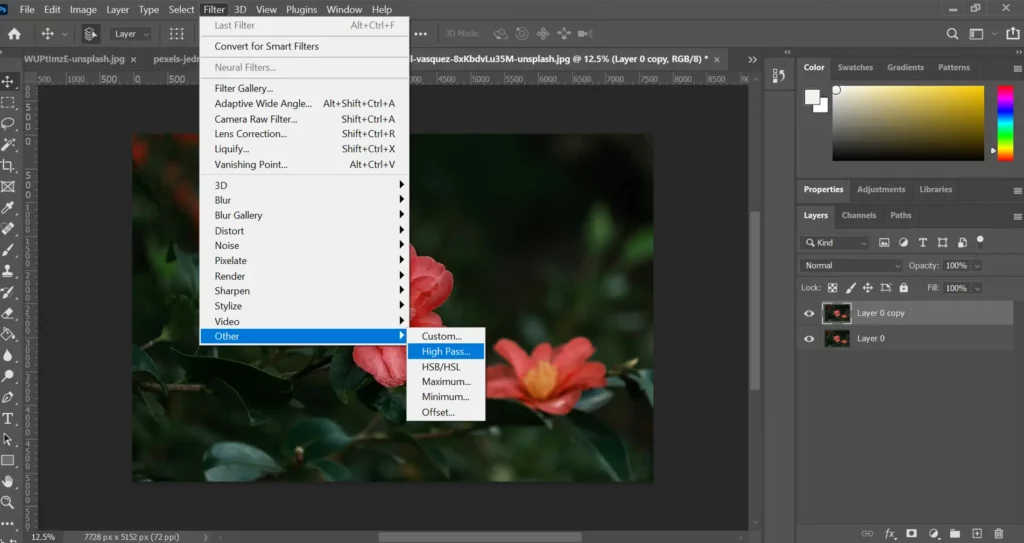
Duplicate your layer, go to Filter → Other → High Pass, and set Radius until edges are just visible. Change the layer blend mode to Overlay or Soft Light and mask areas that shouldn’t be sharpened.
When to Use: If your task is an advanced edit that requires very precise selective sharpening.
When to Avoid: If you are a beginner or your quick edits do not require fine control.
Pros: Clean, precise, avoids artifacts, allows selective sharpening.
Cons: Requires more steps and understanding of layers and masks.
Watch Zenzdesign’s video tutorial to learn more about Photoshop:
Best Sharpening Settings for Different Scenarios
The success of sharpening images in Photoshop depends on the kind of picture. Choosing the right settings assists in maintaining natural details and prevents over, processing while figuring how to sharpen an image in Photoshop.
| Portraits | Apply Smart Sharpen or Unsharp Mask. Radius: 0.51 px. Amount: 5070%. Highlight eyes and hair, keep the skin soft. |
| Landscapes | Radius: 12 px. Amount: 80120%. Use layer masks to selectively sharpen only those areas of the textures. |
| Web Images | Radius: 0.30.8 px. Amount: 4060%. You should always preview at 100% zoom. |
| Print Images | Radius: 13 px. Amount: 120150%. Make sure to check print previews. |
AI tools make such a process easier for users who dabble with the question how do you sharpen an image in Photoshop efficiently.
Why Photoshop Sharpening Is Often Not Enough
Traditional Photoshop sharpening is usually very accurate, yet it is mostly based on the manual judgment of the user. The user has to constantly make decisions during every adjustment of the image concerning how much sharpening is needed, where it should be done, and which areas should be protected. Such a trial, and, error method leads to inconsistent results, especially when one has to deal with big batches or image types one is not familiar with.
Since Photoshop sharpening tools depend mainly on the contrast of edges, they basically treat all details the same way. Therefore, flat areas like skin or sky can get noise, while the fine textures might be sharpened excessively. This drawback is not about the quality of the tool but about the amount of control and expertise that the process requires.
Smarter Alternative – Sharpen Images with AI Using Artguru
AI powered sharpening tools such as Artguru use a different method to tackle the issue. The AI in such tools does not confine its analysis of detail enhancemen to only checking the contrast of edges; it studies the image deeply and ‘structurally’ to figure out detail enhancement and restraint areas. Thus, soft areas and textures, as well as edges, are not just uniformly treated but separately too.
Thanks to this Artguru can highlight the important details without causing halos or increased noise. For those who want stable results without much of manual tweaking, AI sharpening opens up a way that is not only quicker but also more reliable to improve clarity while keeping a natural look.
How to Sharpen an Image Using Artguru
Sharpening pictures manually may be very time consuming and result in inconsistencies, especially when you are still figuring out how to sharpen an image in Photoshop without adding noise or halos. Artguru makes this simpler by using AI, powered sharpening which emphasizes clarity while maintaining a natural appearance. It is intended for those who want guaranteed outcomes without playing with multiple layers or sliders. In addition to that Artguru AI offers many tools that complement Image sharpening, such as Artguru photo enhancer that can improve the image quality up to HD/4k, and Artguru image upscaler that upscale images up to 4k/8k quality.
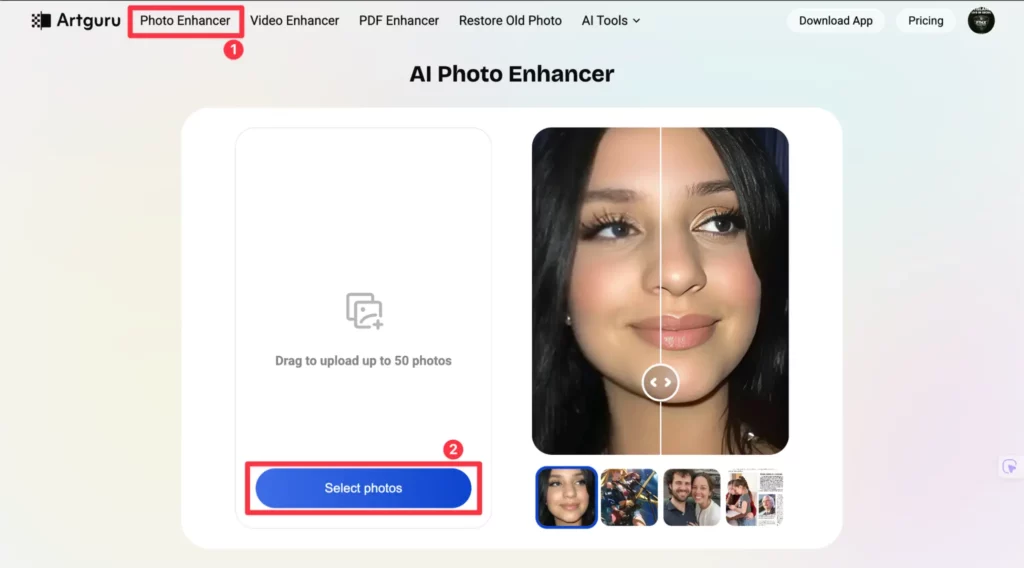
Step 1: Upload Your Image
Directly upload your photo into the Artguru interface via the upload button. The tool accommodates standard image formats, and the whole operation lasts only a few seconds.
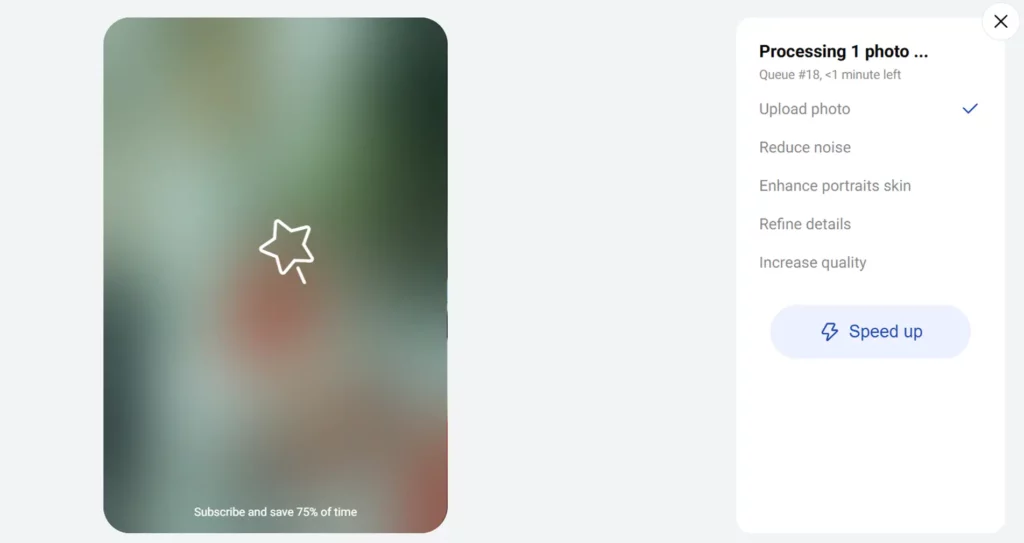
Step 2: Apply AI Sharpening
After uploading, the AI automatically analyzes the image. The engine detects the edges, textures, and gentle areas without any help and thus brings out the details.
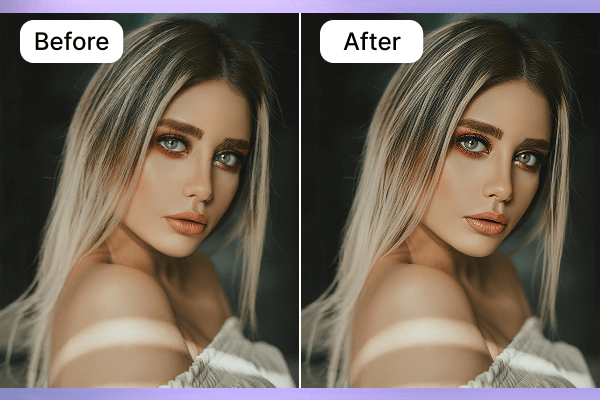
Step 3: Preview & Compare
Use the before and after images to evaluate the enhancements. This step ensures that the sharpening is neat and well, proportioned.
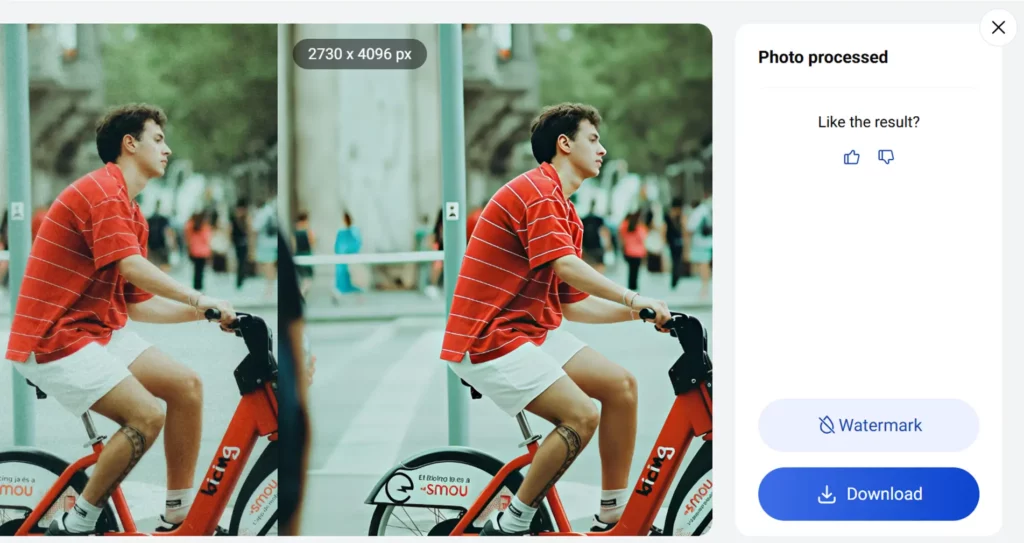
Step 4: Download Final Image
Download the polished image that can be used for the web, print, or social media. This method is a quicker way for people to get the same results when figuring out how to sharpen photos in Photoshop.
When Artguru Works Better Than Photoshop
Indeed, there are a few instances when the Artguru AI sharpening tool works better and faster than the traditional Photoshop methods. Namely, it:
Blurry portraits: Improve the quality of complex and detailed portraits without needing complicated manual adjustment steps.
Old or scanned photos: restores the edges and textures pretty much the same as if you layer, based sharpened but saved a lot of time.
Low resolution images: the AI can beautifully uncover details that are worth seeing and at the same time, it keeps the noise at minimum.
Speed over control: When time is of the essence, it is able to deliver great results in a matter of seconds thereby not having to spend so much time on trial, and, error adjustments.
Check how people use Artguru AI Enhancer to sharpen image:
Photoshop vs Artguru AI – Which Should You Use?
Choosing between Photoshop and a good AI enhancer depends on whether you prioritize manual control or faster results when learning how do you sharpen an image in Photoshop.
| Feature | Photoshop | Artguru AI |
| Control | High | Moderate |
| Ease of Use | Steep learning curve | Beginner-friendly |
| Speed | Slower, manual adjustments | Fast, automatic |
| Best For | Professional edits, complex layering | Portraits, AI creation, old photos, low-res images and more |
Common Photoshop Sharpening FAQs
1. How to sharpen an image in Photoshop without noise?
Apply Smart Sharpening or High Pass on a duplicate layer or Smart Object. Make small adjustments with the sliders and use layer masks to cover the smooth areas.
2. What’s the best sharpening method?
Generally, Smart Sharpen in Photoshop is a good choice for most pictures as it maintains both clarity and subtlety. Unsharp Mask in Photoshop is fine for bringing out details in a controlled way, whereas High Pass gives the precision of a pro, level adjustment. For tasks on the go, or inexperienced users, Artguru online sharpening tool is one of the best options in the market.
3. Can AI fix blurry photos?
Most definitely! Artguru, for example, automatically detects the structure of the image and sharpens the edges, thus providing a cleaner finish with little manual work. This way, even if someone is a beginner, and struggling to figure out how to sharpen photos in Photoshop, he can still do the task using AI with ease.
Final Thoughts
Image sharpening in Photoshop is about control, not excess. Once you understand the tools and their limits, you can choose the right approach for every image. Whether you prefer manual precision or AI enhances like Artguru, knowing how you sharpen an image in Photoshop gives you cleaner, more intentional results.