Pixelation is one of the most common problems in photography. It could happen to your family photos, a file you need to send to your client, or even a screenshot you post online. Being zoomed in, the image breaks into blurry, square-like pixels. Pixelation is so recognizable that it can be detrimental to your professional image.
While there are tons of solutions, two prominent methods are normally most trusted: Photoshop (professionals) or AI image enhancers (beginners to advanced users). In this article, we’ll explore the step-by-step process of both methods to achieve the best and most comprehensive image quality.
What Is a Pixelated Image and Why Does Pixelation Happen?
Pixelation can be defined as the phenomenon where pixels appear as blocky, blurry squares. It is widely believed that losing details in the image file is the culprit behind this phenomenon. Pixelation never comes alone; it’s a result of a combination of factors. Some of them can be named as follows:
- Low resolution source: The original photo was small and low-resolution from the moment it was taken. Therefore, when enlarged, image distortion occurs.
- Heavy compression: Your photos will all go through a compression process before being posted to most social media sites today. Details which are lost through this process can’t be recovered, turning the picture into a low-resolution one, and pixelation is inevitable.
- Screenshots and heavy crops: Screenshots are often lower in resolution than what’s displayed on the screen. While they are formed, losing details is expected, which becomes worse if you try to crop them afterwards.
How to Fix a Pixelated Image Online for Free (Fast and Easy)
Solutions can be found easily online. A quick search on Google returns thousands of results for the “fix pixelation” keyword. Yet, if you’re looking for a quick and automated solution, online tools can save you a lot of time and effort. The results often exceed your expectations. The steps are as simple as follows:
- Choose the best version
Use the original file whenever possible instead of a screenshot or a re-downloaded version. - Upload to an AI enhancer
AI tools work best on mildly pixelated or compressed images. - Preview at full size
Check text, faces, edges, and gradients where pixelation is easiest to spot. - Download a clean copy
Keep a master version to avoid repeated compression later.
This is often the fastest answer to how to fix pixelated images, especially when you just need a usable result quickly.

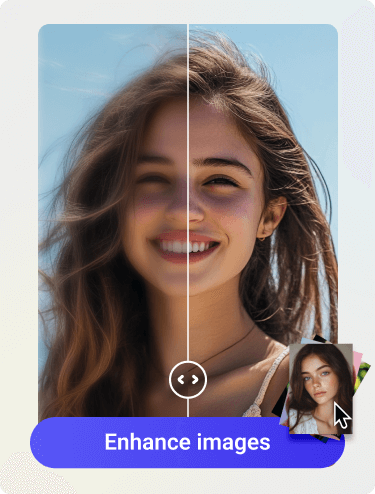
AI Image Enhancing and the Artguru Unpixelate Image Tool
The way AI improves image details is completely different from traditional methods. AI analyzes the details in the image, retrieving data from its machine learning datasets to predict missing pixels. This makes it a more powerful and effective tool than basic sharpening.
The Artguru Unpixelate Image tool is a comprehensive tool that runs right in your browser. You simply upload the image you want to improve, and Artguru handles everything else. It cleans up pixelation in seconds, suitable for all situations and prioritizing speed.
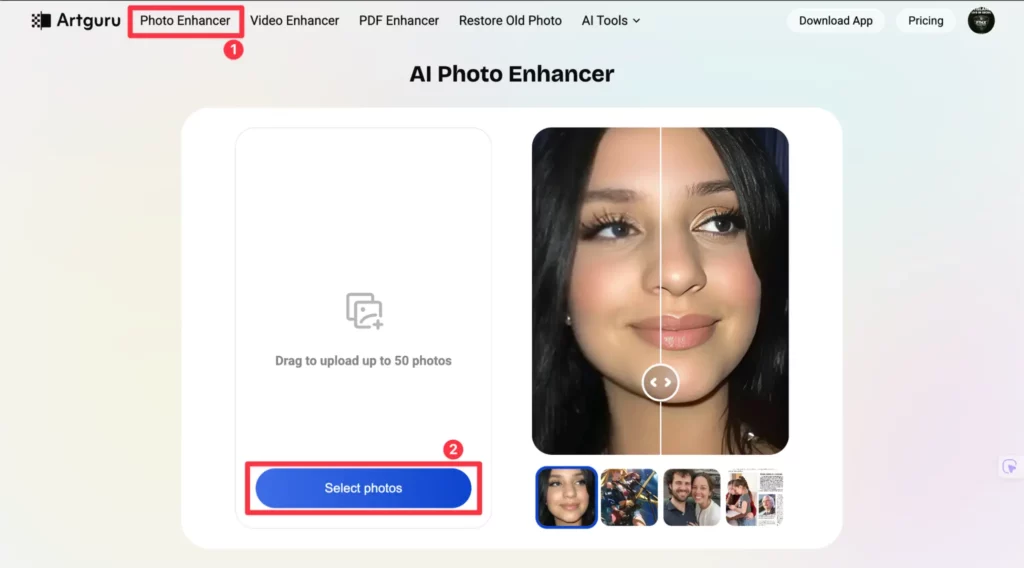
Step by Step to Unpixelate an Image with Artguru
If you are searching specifically for how to unpixelate an image, this is the most straightforward process:
Step 1: Upload your image
You can upload your photos using either Photo Enhancer or the Pixel Remover. The original file is usually recommended at this step. However, if you don’t have it, Artguru photo enhancer can still upscale the image to a high quality.
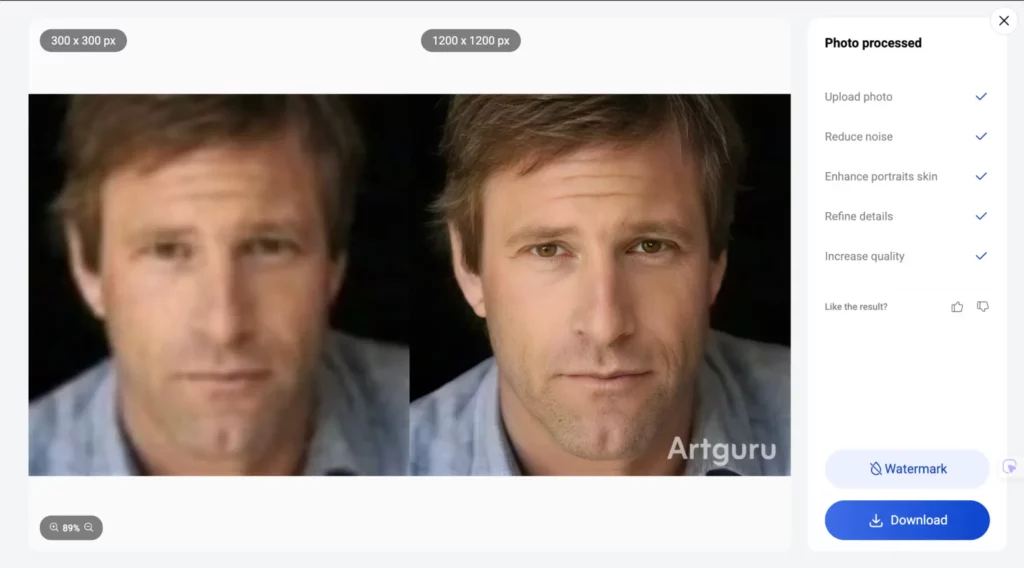
Step 2: Run the unpixelate process
Artguru will immediately analyze and fill in any missing details in your photo. The automated process means you don’t need to do anything except grab a cup of coffee and wait for the process to complete.
Step 3: Preview the result carefully
- Zoom in and inspect:
- Text and logos
- Facial features
- Sharp outlines
- Background gradients
Step 4: Download the improved image
Save it as your new master file for future use.
This method also answers how to fix a pixelated photo when you want results without manual editing.
When to Use Online Tools to Unpixelate an Image
Online AI tools are ideal when:
- You need fast results
- The image is slightly pixelated or compressed
- You are working with many images
- You do not need precise control over specific areas
They are less suitable when:
- The image is extremely damaged or very small
- You need to edit only certain parts of the image
- You care about your privacy and prioritize using offline tools.
In short, if your priorities are speed and time savings, online tools are the ones that you’re looking for. On the other hand, if you want more customization and prioritize precision, Photoshop is a better choice.
How to Fix Pixelated Image in Photoshop (Step by Step)
Photoshop is always a powerful tool for advanced users. They can notice the problems of an image and know the steps needed to fix them. Typically, you’ll need experience with the numerous features in Photoshop before confidently claiming you can skillfully correct pixelation. This section explains how to fix pixelated image in photoshop in a practical way.
Step 1: Convert the image to a Smart Object
Any edits on a Smart Object can be easily redone, allowing you to further adjust your images. You just need to right click on the layer and choose “Convert to Smart Object”.
Step 2: Reduce noise and compression artifacts
Use noise reduction tools to soften blocky areas without destroying detail. Click Filter > Noise > Reduce Noise. Adjust settings slowly and avoid pushing them too far.
Step 3: Apply Smart Sharpen carefully
You should experiment with gradually increasing the sharpness of your image using the Smart Sharpen tool until you find the right level. Select Filter > Sharpen > Smart Sharpen. Avoid increasing the sharpness too much, as this can cause halos around the edges.
Step 4 (Optional): Smooth harsh blocks if needed
In areas with strong pixel blocks, a very light surface blur can help smooth transitions while keeping edges intact. You can easily find 3 ways to smooth those blocks on Adobe website.
Step 5: Export your image properly
Instead of saving in heavy JPEG compression, you should keep a master file and export separate versions for different purposes. Select File > Export > Export As… and choose the format that you want. Photoshop cannot magically recreate detail from extremely small images. However, it can reduce noticeable pixelation and improve clarity when carefully and properly handled.
How to Fix a Pixelated Image on iPhone and Android
On mobile devices, there are two effective options:
- Use an online AI image enhancer in your browser
Upload, enhance, download. This often gives better results than mobile sliders. - Use built-in photo editors gently
Apply small amounts of sharpening and noise reduction. Avoid strong clarity or structure adjustments that make pixel blocks worse.
The original file is always recommended for uploading to AI tools. Starting with a high-quality file will yield far better results than using a low-quality original file.
Online AI Pixel Remover vs Photoshop: Which Is Better?
Choose an online AI pixel remover if:
- You want fast results
- You are fixing common low-resolution or compressed images
- You do not need selective editing
Choose Photoshop if:
- You need precise control
- You want to work on specific areas
- You are preparing images for professional delivery
You can also combine both approaches mentioned above. You can have an AI tool process and enhance the images before further refining them in Photoshop to your liking.
How to Avoid Pixelated Images in the Future
As an old saying goes “prevention is better than cure”, once you have a high-quality photo from the start, enhancement is unnecessarily important. You should do the following while taking a photo:
- Capture images at higher resolution
- Avoid heavy digital zoom
- Do not repeatedly save JPEGs
- Share originals instead of compressed versions
- Use proper export settings for web and print
FAQ: Fixing Pixelated Images
Can Artguru really enhance my pictures?
Yes. Artguru is one of the most highly regarded AI enhancer in the field of image processing. Pixelation can often be significantly improved when processed on Artguru.
How long does it take to remove pixelation?
This process usually only takes only a few seconds on Artguru. A preview is immediately displayed so you can see the final result before downloading.
Is Photoshop better than online tools?
Obviously, Photoshop gives you much more control of your pictures. However, it requires you lots of experience working with hundreds of tools and features. Therefore, if you are not familiar with Photoshop, AI online tools like Artguru are highly recommended.
Conclusion
Pixelation is a common phenomenon in photography. It is too common that thousands of solutions can be found easily online. Online tools like Artguru always prioritize fast processing speed and automatic processing while Photoshop gives you more control over your photos. Hopefully, this article has given you a better overview of pixelation and how to improve it.