Resizing images without losing quality is a common challenge for many users, even for me. Whether you’re preparing images for printing large posters, optimizing images for social media, or enhancing your website visuals, you definitely want to maintain the clarity of images while changing their sizes. However, resizing images can lead to blurry, pixelated, or distorted results if not done correctly. In this guide, Artguru will teach you some easy methods about how to resize an image without losing quality.
Resolution and Pixels: Which Plays a Bigger Role in Image Quality?
To understand how to resize images without losing quality, it’s essential to know the relationship between resolution (DPI) and pixels.
- Resolution (DPI): Resolution is measured in dots per inch (DPI), and it represents the number of pixels per inch in the image. A higher DPI indicates more pixels per inch, leading to better clarity and detail, especially when printing. For instance, images with 300 DPI are typically suitable for high-quality print jobs.
- Pixels: Pixels are the smallest units of a digital image. The total number of pixels (height x width) determines the image’s overall quality and sharpness. More pixels mean more detail and a higher-quality image.
While resolution (DPI) is important for clarity, especially in printing, pixels have a more significant impact on the overall image quality. More pixels provide more detail and allow for higher-quality enlargements. The pixel count determines how detailed the image can be, while resolution influences how that detail is distributed per inch on the printed page or screen.
When you change an image’s physical size (enlarge or reduce it), its resolution may need to be adjusted accordingly to avoid losing clarity.
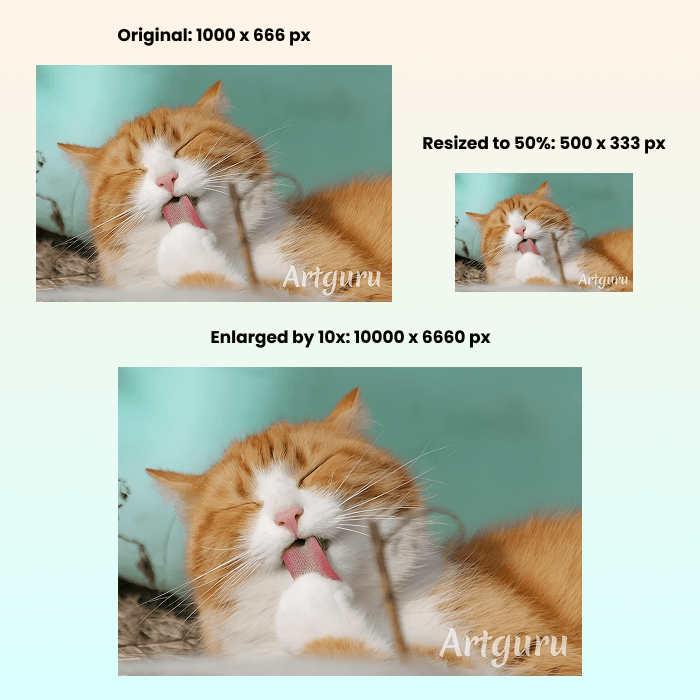
Example: Let’s say you have a 3000×2000 pixel image at 300 DPI. It can be printed at 10 x 6.67 inches without losing quality.
If you enlarge the image to 20 x 13.34 inches, but keep the 300 DPI setting, the pixel density will decrease, leading to a loss of sharpness. To prevent this, you would need to either increase the DPI or use higher-resolution images.
To maintain clarity, especially when enlarging an image, you need to increase the pixel count to match the larger size or resolution.
How to Resize Your Image Without Losing Quality
If you know well what really would affect your image quality, you can find some super easy way to keep the quality when you scale your images for your use. Here, follow Artguru to learn how to change the image size in a few clicks.
Using Online Tools for Simple Resizing
One of the easiest ways to resize images is by using an online image resizer like SimpleImageResizer, now let’s take it as a good example.
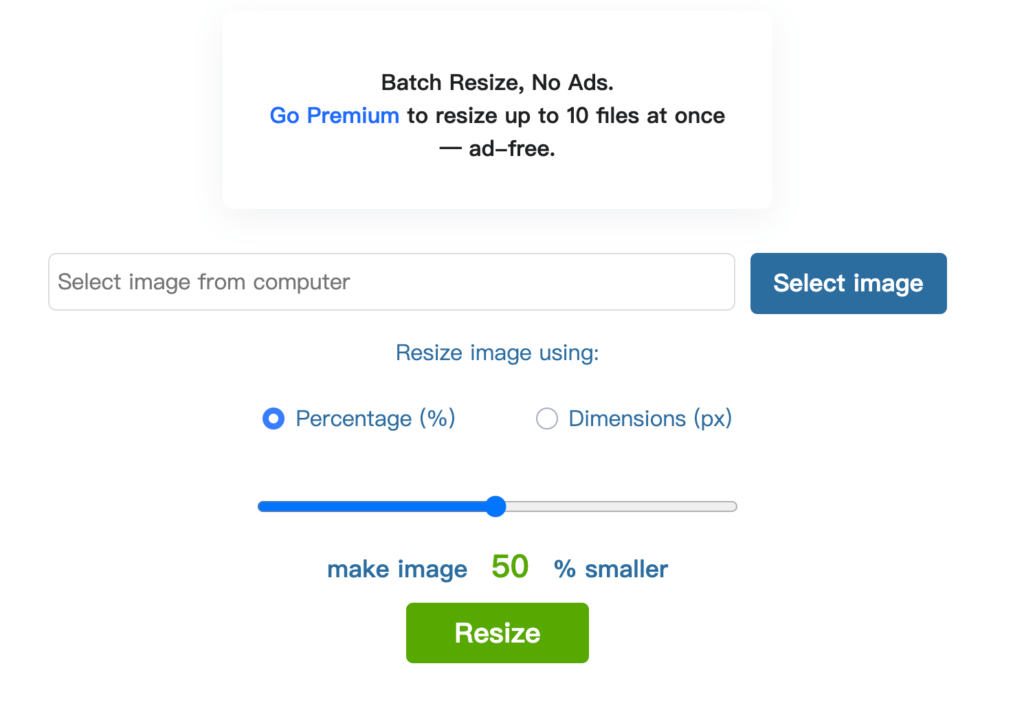
The interface of SimpleImageResizer is very simple, indicating that it may be a good choice for those who have no editing skills. When uploading the image, it can not be dragged and dropped, so you need to click Select image and choose from your device.
There are two options to resize your image: Percentage (shrink) and Dimensions (shrink and enlarge). With the Dimensions option, you can scale the image to any size you want. Simply input the desired new dimension for your image, whether you want to make it smaller or larger.
Take a close look at the adjusted image below – the result is actually quite good. Whether enlarging or shrinking the image, there is no noticeable loss in quality.
Additionally, one of the advantages of this tool is that it is completely free. While there are some ads on the page, they do not interfere with your usage. This means you can use this online tool to resize images without spending any money or learning costs, all while maintaining image quality.
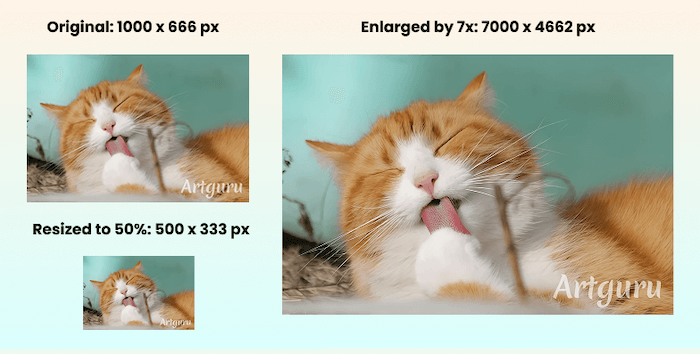
However, it’s important to note that this tool seems to have limitations when it comes to enlarging images. For example, the 1000 x 666 px image above cannot be enlarged to 10000 px (a 10x enlargement). So, if you have a need to enlarge images significantly, you might want to explore the methods below.
Resize Images Using Photo Editing Software
If you want to have more control over how your image is resized while maintaining high quality, using photo editing software like GIMP or Photoshop is a great choice. These programs allow you to adjust your image’s size exactly the way you want, with more options than online tools.
When resizing an image, it’s important to understand the relationship between resolution and dimensions. As you change the dimensions (width and height) of the image, the resolution (the number of pixels per inch) may also change, which can affect the image quality. To keep your image sharp and detailed, you should ensure the resolution stays proportionate to the new size.
Here’s how to resize an image using GIMP:
Step 1. Open the Image
Start GIMP and open your image by going to File > Open and selecting the image you want to resize.
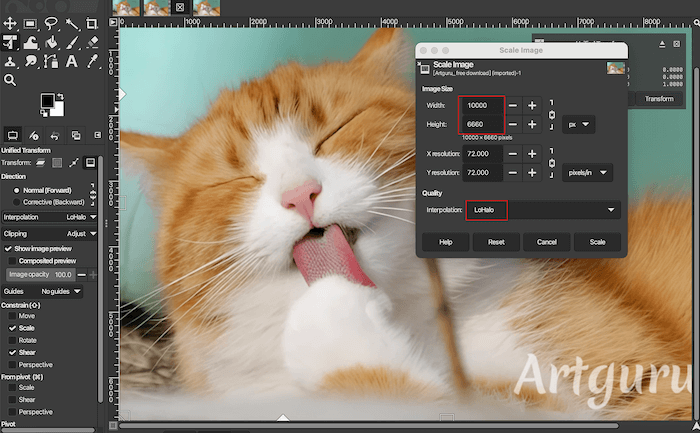
Step 2. Access the Scale Image Tool
Click on the Image menu in the top bar and select Scale Image.
Step 3. Adjust the Dimensions
In the Scale Image window, you can change the image dimensions (width and height) in pixels or by percentage. Enter the new values for the size you want.
Step 4. Adjust the Resolution
Below the dimensions, you’ll see fields for X Resolution and Y Resolution. Make sure to adjust these values to keep the image’s quality intact. A higher resolution (measured in pixels per inch, or PPI) is crucial for maintaining clarity, especially when resizing images for print. Higher resolution ensures that the image remains sharp and detailed when printed, which is important for physical output.
Step 5. Choose Interpolation Method
In the same Scale Image window, you’ll find an option to choose the interpolation method. Select Lohalo (recommended) to help reduce pixelation and artifacts, especially when enlarging the image.
Step 6. Apply the Changes
After making all the adjustments, click Scale to apply the new size and resolution to your image.
Step 7. Save the Image
Finally, go to File > Export As to save your resized image in the desired format, and it’s recommended to export the image as a PNG. Because PNG is a lossless format, meaning it retains all the original quality without any compression artifacts. On the other hand, JPG (JPEG) is a lossy format, which reduces image quality by compressing the image and discarding some of the details to save file size. While JPG may be suitable for photographs or images where file size is a priority, PNG is ideal for images that require crisp details and transparency, such as logos, graphics, or screenshots.
By following these steps, you can ensure your resized image maintains its quality, whether shrinking or enlarging. Keep in mind, enlarging an image requires more memory.
One of the best things about using photo editing software is that you get full control over how the image is resized. By carefully selecting the appropriate dimensions and interpolation method, you can ensure that the image retains its quality. This is particularly useful when you want to make sure your image looks great at any size.
However, the downside is that you need to install the software first, and it can be more complex for beginners. It’s also a little more time-consuming compared to using quick online tools, as you’ll need to manually adjust settings.
So, while photo editing software may take a little more time to learn and use, it’s the perfect choice when you want complete control over resizing your images while maintaining clarity and detail.
By the way, if you also want to know how to resize images with Photoshop, check out the video tutorial below to learn it step by step:
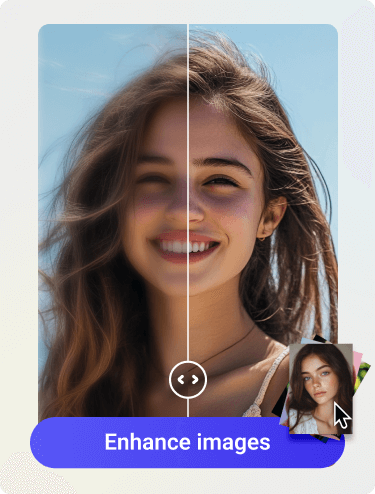
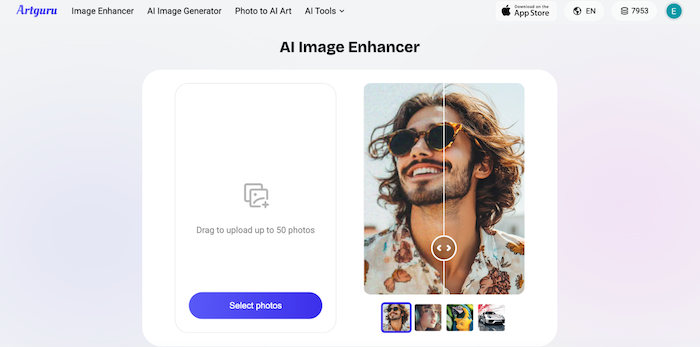
Using an AI Photo Enhancer to Improve Quality First
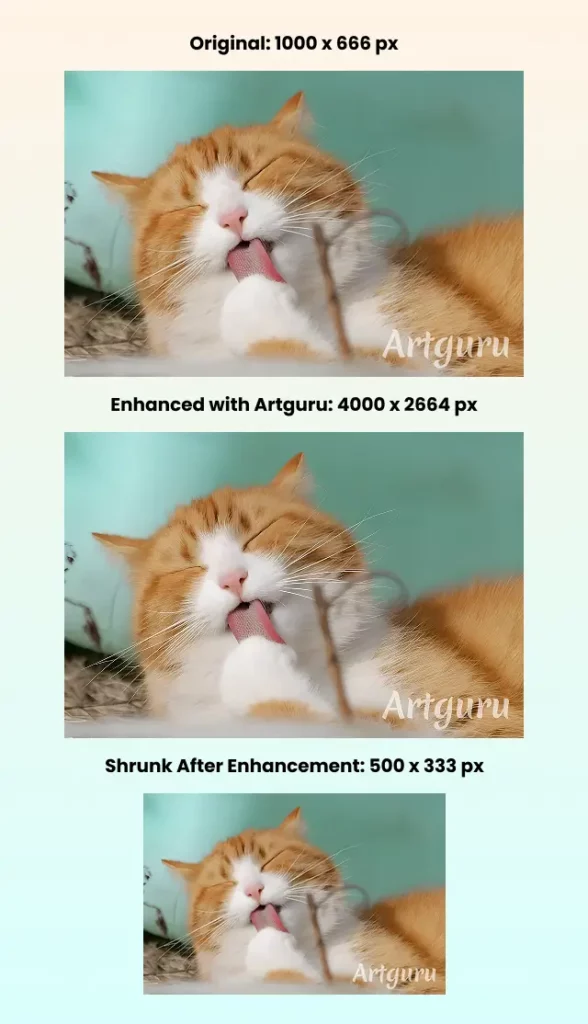
Before resizing an image, it’s a good idea to use Artguru image enhancer to improve its quality. Artguru’s AI analyzes your image to restore fine details that may have been lost or blurred. It reduces grainy noise, sharpens edges, and enhances clarity, giving you a crisper, more defined result. This is especially helpful when you need to resize the image later.
Once the enhancement is complete, you can resize the image using your computer’s built-in image editor, such as Microsoft Paint, Preview, or Photos — without worrying about a loss of quality.
Here’s how to Resize and Maintain Image Quality Using a Photo Enhancer
- Upload your image to Artguru photo enhancer.
- The AI will automatically sharpen details, reduce noise, and remove any blur. All you need to do is wait.
- Once you’re satisfied with the improvements, download the enhanced version.
- Resize the image using your computer’s built-in editor. This ensures that the image maintains its enhanced quality even after resizing.
Conclusion
Resizing images without losing quality is essential for tasks like printing and digital content creation. While SimpleImageResizer is convenient, it has limitations. For more control, GIMP offers precise resizing, while Artguru image enhancer boosts quality, especially for low-resolution images, ensuring sharp, detailed results. Choose the right tool based on your needs to resize images without compromising quality.